Lab 6 focused on a form of image processing technique known as geometric correction and the various ways of accomplishing it. This lab focused on two specific techniques. Those two types of correction are known as image-to-map rectification and image-to-image. These are both done to help ensure image accuracy before it is interpreted and processed.
Methods
The first form of correction we focused on was image-to-map rectification. The goal of this part of the lab was to take an image that was inaccurate and correct it using a map. Hence the name image-to-map rectification. Our study area was Chicago. In order to correct the image, the user must use Ground Control Points or GCPs. GCPs are points the user puts on both the image and the map. They should be as close as possible to the same location on both the image and map. Depending on the image delegates how many points will be needed to correct it. In the case of our image, there was low distortion meaning it was a first order polynomial. Going off this chart (Figure 1) a minimum of 3 GCPs are required.
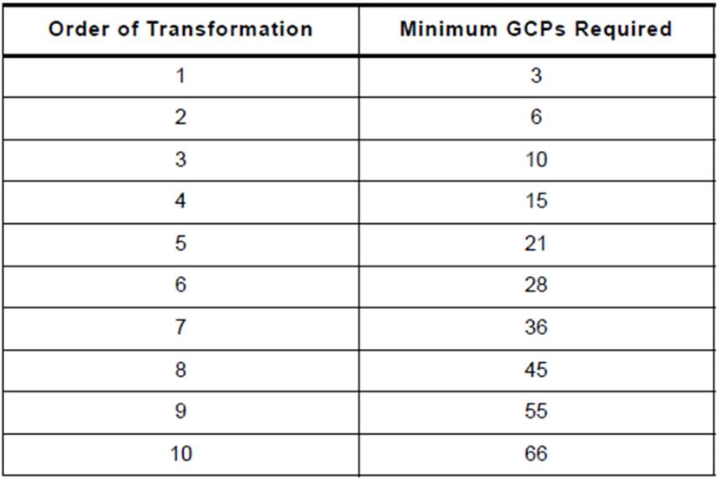 |
| Figure 1 - Required amount of GCPs |
 |
| Figure 2 - Adding GCPs and checking RMS error |
Once satisfied with the level of accuracy it is time to re-sample the image. Re-sampling is mainly done to correct pixels that lack a brightness value. The final comparison of the first image vs. the corrected image can be found below (Figure 3).
 |
| Figure 3 - Resampled and corrected image overtop original |
 |
| Figure 4 - Spliced Image presenting the differences between the distorted image and the already corrected image |
 |
| Figure 5 - GCPs placed on image and RMS error lowered |
 |
| Figure 6 - Finished image spliced with original corrected image |
Images that are properly geometrically corrected and very important when doing accurate analysis. GCP location is essential for obtaining the highest accuracy and getting the RMS error the lowest possible should be a priority. Tools like ERDAS make correction relatively easy if you know the correct methods and what re-sample method to use.
Sources -
Images - U.S. Geologic Survey
Program Used - ERDAS Image
No comments:
Post a Comment